Removing Window Tint or Window Film
When window tint goes bad…
Removing window tint or window film can be a very tedious task.
There are lots of reasons for removing window tint or window film. Safety would probably be the first one when it comes to automotive window tinting. Aesthetics would probably be second with automotive, residential and commercial window tinting removal. Nobody wants it to look bad.
The most common reasons for window tint removal.
Adhesive failure, fading or change of color, delaminating and flaking are common problems when tint goes bad. We also remove window tint for state inspection. Depending on the type of tint and how long it has been on the window may make a big difference in how window tint is removed. Removal options are based on the condition of the film, some work better depending on the situation. Whether it’s a vehicle, your home or your business, one or more of these options may work for you. Some scenarios, like a tint that’s too dark or too light, bubbling, wavy or distorted film and accidental damage are reasons when window tint should be removed.
The most common issue with window tint is adhesive failure.
The telltale signs are tint bubbling, peeling, wavy or rippled appearance, distortion or speckling. This tends to be a moderate to hard removal. The type of installation, whether it’s residential commercial or automotive maybe different in removal. Also there are a couple of different types of adhesives from different manufacturers of window film.
The majority of window tint uses a pressure sensitive adhesive another type is called CDF. The CDF adhesive is a dry adhesive that is activated with water. These films are mainly for commercial and residential installations. The problem is during removal of this window film, basically it bonds to the glass chemically. So when removing it, it can be extremely difficult and may require solvents to remove the adhesive.
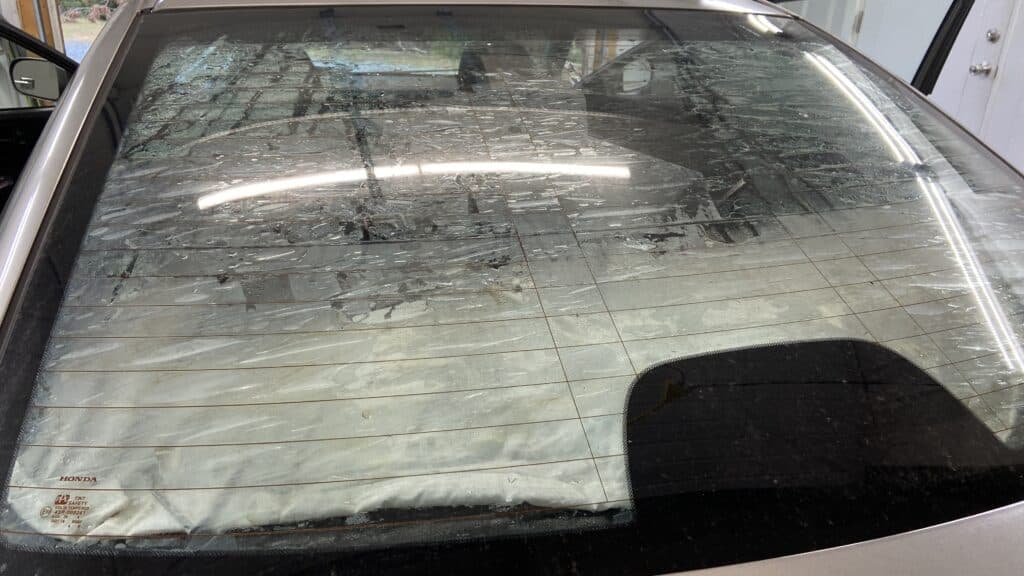
What is delaminating and flaking window tint?
Delaminating and flaking sometimes occur during the lifespan of window films. Delaminating can show up as a wavy or distorted look or peeling away from the window. Flaking occurs when the hardcoat has gone bad. This results in small or very tiny speckles throughout the window film and rubs off onto to whatever touches the tint. Both of these issues can make removal a complete mess. The film can break off in little tiny pieces, ultimately resulting in having to scrape the window while it is wet. These issues can be hazardous to your health when removing the tint. Using a facemask, gloves and protective coverings on your clothes, will reduce the chance of any particles sticking to your skin getting in your eyes or lungs. You probably need to call a professional.
How to remove window tint.
The pull and scrape option.
The least desired, and most cumbersome of labor for window film removal. This process, involves labor and lots of it. Basically, if you can get the film to come off by pulling it off, what will remain is just the adhesive. The adhesive, depending on which type, pressure sensitive or CDF, maybe soaked with a water and soap solution or for CDF film a solvent. I do not recommended doing either if these in direct sunlight if possible. If you’re lucky and the adhesive fogs up, it’s ready to be scraped. Scraping the adhesive off requires either a stainless steel razor blade, white scrubby pads, #000 steel wool or plastic razor. This technique may require more than one time cleaning the glue off the window. This is a messy process and the adhesive may stick to anything it touches like chewing gum, so be careful.
The Steaming option.
I would recommend using a steamer 99% of the time to remove window film. Prep your area for a lot of water, steamers tend to spit water during the film removal. Focus the steamer at the corner of the film to promote release of the adhesive. After a few seconds, use a plastic pry tool to lift and pull back the corner of the film. Carefully and slowly pull back on the film as you steam the window in a back-and-forth pattern across the area that you are pulling on. Most of the time this gets the film and the glue off but may leave some spots that you’ll need to use a white scrubby or #000 steel wool. Steel wool can be very messy itself so be very careful with it.
The Sweating option.
Sweating the film off requires water and a black plastic bag or clear plastic sheet. It works kinda like the steaming process, but takes a little longer. First soak the window down and then immediately cover with the plastic bag or sheet to trap the water against the film. This process takes longer due to the fact that it has to sit for anywhere between 10 to 30 minutes to penetrate the window film. This removal option is best in direct sunlight to promote the sweating process. Once you feel, it’s been on there long enough, try and test it by peeling up the corner. These techniques are very useful for vehicles with defrosters or antennas that are bonded to the rear window.
if it all seems too overwhelming, contact us if we’re in your area or find a professional near you. This can be more of a headache than most people imagine and may not be worth the effort. Cheap usually comes out expensive, so weigh your options and talk to a professional about removing window tint before its too late.
Contact us today
Solar Reflections Window Tinting
We are located at:
806 E Main Street, Locust, NC 28097